Or you can use the buttons
Surveys are nice to see, but you can not manipulate them directly. To be able to copy objects to other areas, or to delete a group of objects, or for backing up purposes, you have to make a Project. Here I will explain how to do that.
Assuming you have a fresh survey on the map, you can start making a project. Before you start, make sure that the project will be visible on the map: select menu Map | Project On Top, and make sure menu Map | Hide Project is not checked.
Or you can use the buttons ![]()
![]() (make sure you see
(make sure you see ![]() ), and
), and ![]() must be in 'up' state (bright).
must be in 'up' state (bright).
On the map, right-click on a cell in the area you want to transfer to the project. Select one of these items on the context menu:
Your selected area will change colour slightly when the operation is completed.
before adding a sector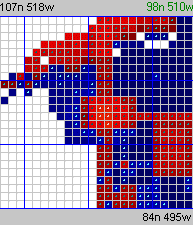 |
after adding a sector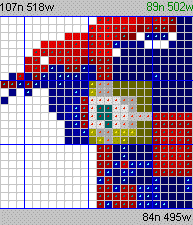 |
NOTE: When adding a zone to the project, make sure you right-click on a cell in the central sector of the zone. As from version 3.434, the central zone will be indicated in green under the bottom-left corner of the map if the mouse cursor is within its boundaries.
TIP: use menu Map | Move Map to | Centre Survey or hit the ![]() Centre map on survey button to place the central sector in the middle of the map's viewing area.
Centre map on survey button to place the central sector in the middle of the map's viewing area.
Repeat as many times as necessary. You can also remove whole cells, sectors or zones from the project with these options:
Adding and removing cells in this way is not easy, be carefull not to miss and hit Sector or Zone if you want Cell! Use the 3x3 view, cells are shown too small on the 5x5 view.
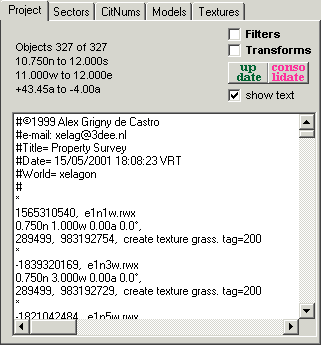
Actually, it is difficult to operate on objects blindly, but we have no choice: the SDK does not provide a bot with enough elements to even think of rendering objects. But we can examine their textual representation. On the right side of the map, on the Project tab, you have a list of all the objects in the project: it is empty by default. Above this list you'll see some global information about your project. To enable the list, make sure show text is checked. If it isn't, check it and press Update.
Note: having show text checked slows down all operations. Only use this option when you need it. To disable this option, just uncheckmark show text and hit Update.
|
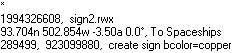
You can look through the list of objects using the vertical scroll bar to the right of the list. To illustrate how these objects look like on the list, I've selected one (not visible on this list):
|
You can double-click on any object in the object lists in the program to activate the Object Manager and view these data in an orderly way! Lists similar to this one can be found in the Cell Viewer.
To find some text in this list (and on other similar ones) right click on it and select Find from the context menu. This brings up a selector to search for text.
You can also select part of the text of an object on the list and right-click on it to bring up a context menu with a few more options:
|
You may have noticed, on the Project tab illustrated above, a line stating: Objects 327 of 327. The project has two sides: a visible one and an invisible one, so to speak. You will see, shortly, that you can clean up the project of unwanted objects. When you do that by using filters, the objects you filter out are not removed from the project inmediately, they are merely made invisible until you consolidate the project. So, in that case, your project will actually have more objects than the visible ones. The line might then say:
You will encounter the same notation x of y in the other tabs for Sectors, Citnums, Models and Textures. |
There are four other tabs in this area: Sectors, CitNums, Models and Textures. They all relate to the project. They have lists as indicated by their caption, about specific details of the project. If you right-click on some of them, you can save the list to file as text.
The Sectors tab has a list of all sectors in the project, with the number of objects in them. Double-click on a sector to view it in the middle of the map.
The Citnums and Models tabs allow you to batch-change the citizen number or model name in the project. This can come in handy when copying projects from one world or universe to another.
The Textures tab lists textures mentioned in the action fields of objects. Up to version 3.433, only the ones in the animate command were listed (as base textures). As from 3.434, both animate and texture commands are included, and the textures and [masks] show the full filename. When the animate command uses base texture notation, ? is used as placeholder for the number in the filename. Textures for animate and texture commands are on separate lines, and so are unmasked and masked textures (for animate commands, the 3.0 convention is followed for masks, i.e. default is unmasked). Base textures (with placeholder ?) and full textures are also on separate lines. The animate command textures have the symbol @ at the end, followed (for base textures) by the highest frame number registered; the texture command textures lack this symbol.
Index |