 Index
Index
Xelagot building tools
Survey Manager
You can call the Survey Manager using the menu Uni item  Survey Manager.
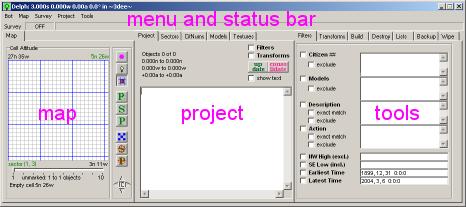
It has a threefold layout (map, project, tools), crowned by the menu and status-bar. When you first open it, by the way, you will have to resize it: the Survey Manager may not fit on some computer-screens: there is a slide-bar at the bottom of the screen to move to its different parts.
This page attemps to give a general overview. More details are to be found on specific pages on Survey and Project.
The MAP AREA
This area is the visual jewel of the Survey Manager. Results of all server queries i.e. the Survey, and of the Projects you make or load from file are shown on the map graphically. You can drag the map around. Its size is either 3x3 sectors + 1 extra row and column of cells (250m x 250m), or 5x5 sectors(400m x 400m). Note: the 5x5 map was introduced in X1 version 3.434.
 |
|
 |
| 3x3 map area |
|
5x5 map area |
The top-left and bottom-right cell positions are shown at the top-left and bottom-right of the map (in black letters). On the top-right, in green, is shown the position of the cell the mouse cursor is on, and on the bottom-left, also in green, the corresponding sector. If this is a central sector of a Survey, it will be marked 'central sector'. Move your mouse cursor on the map to see how this works. (Note: the sector is only shown in X1 version 3.434 or higher).
You can right-click on a cell of the map to activate a context menu with many options, and double-click a cell on the map to activate the Cell Viewer.
The map's context menu has the following items:
- the cell position and the sector (X1 version 3.434 or higher).
- Query here - brings up the selector to start a Survey at the cell and sector you clicked on. 5x5 and 3x3 modes of querying the world server are selected automatically by the bot, depending on the capabilities of the world server.
- Bring bot to SE corner of cell: Top, Bottom, Same Altitude - the top and bottom are the coordinates of the highest and lowest objects in the cell.
- Cell Position to Buffer - there are 9 buffers where you can store positions for later use.
- -
- Add Cell to Project - copies the cell from the Survey to the Project. The bot must be surveying the area, otherwise a survey will be started.
- Add Sector to Project - copies the sector from the Survey to the Project. The bot must be surveying the area, otherwise a survey will be started.
- Add 5x5 (or 3x3) Zone to Project - copies the zone from the Survey to the Project. The bot must be surveying the area, otherwise a survey will be started. Caution: to copy the zone you are actually querying, you must right-click on a cell in the central sector of the Survey zone, otherwise a new survey will be started with the sector you indicated used as central sector.
- -
- Remove Cell from Project - removes all the contents of this cell from a Project.
- Remove Sector from Project - removes all the contents of this Sector from a Project.
- Remove 3x3 Zone from Project - removes the contents of a 3x3 zone centered on this Sector from a Project.
- Remove 5x5 Zone from Project - removes the contents of a 5x5 zone centered on this Sector from a Project.
Notice two things:
1) the context menu item 'Query here' is one way to start a Survey. You can also use the main menu Survey | Start Query.
2) use of the above items 'Add cell...'., 'Add sector...', 'Add zone...' is the primary way to create a Project from a Survey.
Below the map there is a slider to adjust the appearence of a dot in the cells, depending on the number of objects in the cell. Under the slider, you will see some information about the cell your mouse cursor is on.
To the right of the map, in a vertical column, there are a few buttons to modify the way surveys are made and what the map shows. Most of these options can also be set with the menus Map and Survey.
 Map Tracks Bot - the map will follow the bot's position if the button is down (off by default).
 Auto-Survey - auto-query the zone shown by map and the sectors surrounding the zone to fill the map area if the button is down (off by default).
 Use Cache - use disk cache to speed up querying if button is down (on by default).
 up,
up,  down: Project on top, Survey on top - sets whether the project covers the survery on the map or the other way round (project covers survey by default).
 Show Survey, Hide Survey - hides the survey on the map when the button is down (shows by default).
 Show Project, Hide Project - hides the project on the map when the button is down (shows by default).
The next buttons are new in X1 version 3.434
 and
and  View 3x3/5x5 - toggles 3x3 and 5x5 map viewing mode.
 Centre on Survey - centres the map on the survey's central sector.
 Centre on Project - centres the map in the middle of the Project.
 Move the Map or the Camera - clicking on any of the arrows moves the map (or the camera) to the North, South, West or East, depending on the centre button 'up' or 'down' state: if 'M' (map) is shown, it moves the map, if 'C' (camera) is shown it moves the camera (default) i.e. it moves the map in the opposite direction. The state of this button is remembered between sessions. Key combinations while clicking on the arrows: no key = moves 5 sectors, CTRL key = moves 3 sectors, SHIFT key = moves 1 sector, CTRL+SHIFT keys = moves 1 cell. The 'C' (camera, button down) state of the centre button emulates the use of buttons and keys elsewhere: the viewing position changes. See, for example, your browser use of the keys, and also the Cell Viewer menus to move the view of the cell. The 'M' state is equivalent to dragging the map with the mouse cursor. Each user should decide what seems more natural. Try testing this by pressing the ARROW buttons while you press SHIFT or SHIFT + CTRL, and decide which method you prefer: the 'C' camera or the 'M' map dragging method.
The PROJECT AREA
This area has a few tabbed pages, all relevant to the projects you make.
- tab Project: an object-list text viewer, which is normally blank. Checkmark show text to list the objects. Uncheck it when operating on a Project, as it slows down your actions and may even produce an error message if the list is too long. This tab also containd checkboxes to apply filters and transforms, and buttons to
 update and
  consolidate the project. See the menu described below for more details, and the Project page.
- tab Sectors: list of all sectors in your project
- tab CitNums: citizen numbers of objects in your project. This tab can be used to change the citizen numbers.
- tab Models: list of all models in your project
- tab Textures: list of all textures in the action field of the objects (not those inside the rwx or cob files).
Citnums, Models and Textures can be saved to file by right clicking on the list.
The TOOLS AREA
Here too, a few tabbed pages contain valuable tools for managing your projects, for building and destroying.
- tab Filters: tool for cleaning your project of unwanted objects
- tab Transforms: tool for moving your project to another location, and rotating it
- tab Build: tool for building
- tab Destroy: tool for destroying
- tab Lists: the lists of object collections and the two extra buffers
- tab Backup: 3.1 world backup facility.
- tab Wipe: 3.1 facility to delete all objects in the world in one command (caretakers only).
The MENU
The images correspond to buttons.
Bot
- Bot 1 - bot selector
- Bot 2
- Bot 3
- close - to close the Survey Manager
Map
Survey
- Start Query - brings up selector to start a survey query of the world server
- Stop Query - stops an ongoing query, clears the map area of survey data
- Auto-Survey - toggle - auto-query zone shown by map and the sectors surrounding the zone to fill the map area (off by default)
- Use Cache - toggle - use disk cache to speed up querying (off by default) - map button
- Save Survey - does nothing at all :)
Project
- Load Project - clear the project in memory and load a file containing a project, recognises automatically 3 formats: xelagot, Canopus, propdump
- Merge Project - same as load, only adds to existing project
- Save Project - saves project in xelagot format
- Save Project as - saves project in Canopus blp and propdump formats
- Update Project - updates the visible part of the project , applying filters and transforms
- Consolidate Project - removes all unwanted hidden objects from the project (filter), moves the project if it has been transformed
- Project Origin - to select any coordinate as project centre
- Count Duplicates - counts duplicate objects in project (duplicates are objects with the same model and in the same position)
- Remove Duplicates - removes all but one of the duplicates
- Keep Duplicates Only - keeps all duplicates, removes the rest
- Clear Project - clears the project from memory
Tools
- Cell Viewer - a 3.1 world function, allowing you to select a specific cell in the world and view its contents (Survey) whether the cell is being surveyed or not. Works also in older worlds if the the area is under survey. Also shows the cell of a Project. It can be activated too by double-clicking on a cell in the map, or by right-clicking on an object in the list and selecting Cell Viewer from the pop-up menu.
- Translation Calculator - to calculate distances between coordinates
- Clear Position Buffers - to clear the buffers 1 to 9 containing positions
The STATUS BAR
The status bar shows whether the bot is querying (i.e. making a Survey of) a zone or not, and in which of the two modes it is working: auto-querying what the map shows, or querying one defined zone. It also shows the corner coordinates of the zone being queried. As from X1 version 3.434, it also shows the central sector of the queried Survey.
Index |